Total Pageviews

Thursday, March 7, 2013

One Good Turn

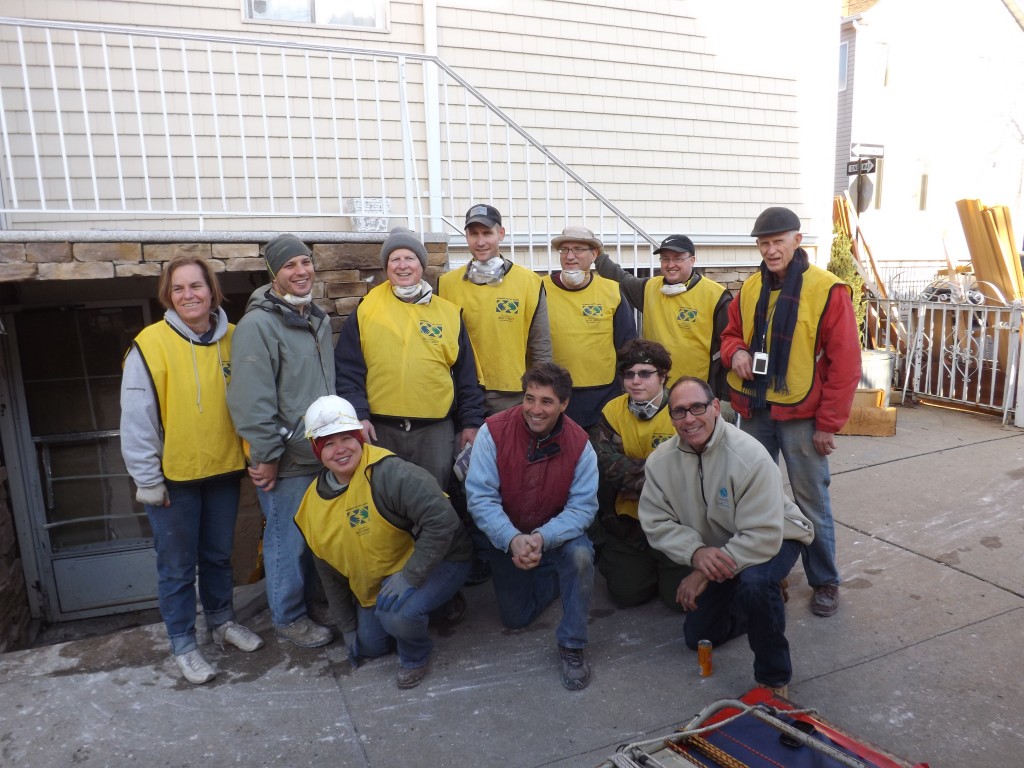
Meg in New York with Mormon Helping Hands after Hurricane Sandy


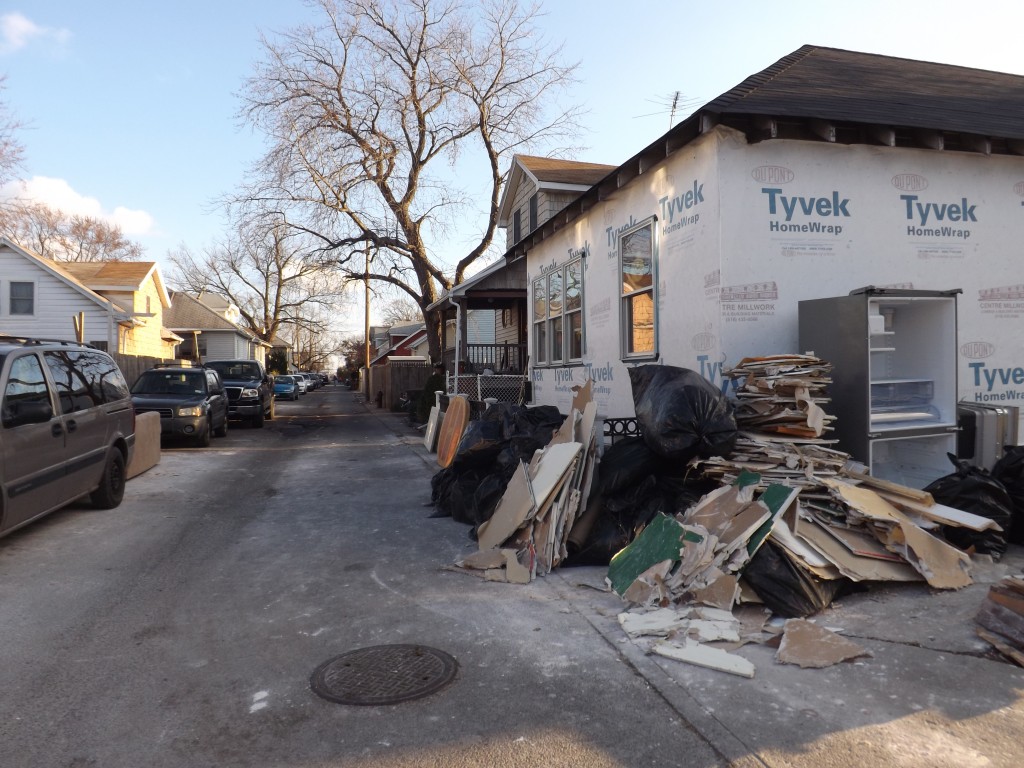
This past Thanksgiving weekend I was planning to prepare my garden for the winter. But Hurricane Sandy had hit New York City hard that fall, so I joined a group of volunteers to help clean up in Queens instead. The damage was amazing, even several weeks after the storm hit. Here were a few more pictures I took during that weekend. The first is a car damaged by the storm, the next one of the houses we helped clear out (this picture is after the dump truck took away most of the contents of this home, newly remodeled only the prior November).


I don't regret the time I spent in New York, but my own yard remained messy throughout the winter. There were remains from various projects, yard debris, and general unkemptness. Here's a couple of shots showing the mess:


Then my local Mormon missionaries stopped by this past month. "Is there anything we could do to help you?" they asked.

"Anything?" I said. "Well, I could use some help with my back yard..."

They were good to their word and showed up last Saturday, ready to make quick work of a mess that had bothered me all winter. Here's a couple of shots after they'd moved the trash out of my yard:


Yeah missionaries! Many hands make light work. Now I can get started on my spring garden without hours of dirty, heavy lifting in my way!

Sunday, February 17, 2013

Sincere Flattery?


I spent a few minutes today catching up on favorite youtube channels and blogs. In the process, I stumbled across a video that looked unusually similar.

There was the bulkhead fitting created out of electrical conduit connectors. The standpipe had the Affnan-style flared mouth I figured out how to make out of standard US plumbing fixtures. The bell on the siphon had the same cap and a series of slots sliced into the base, as I'd done.

On the other hand, I didn't see a media guard. And instead of using the single 45 degree connector to exploit the coanda effect to form the siphon-starting water plug, the author of the video had a traditional 90 degree connector, but with a 45 degree connector at the end. From a hydrodynamic point of view, the 45 degree connector at that location wouldn't do anything useful. The video creator didn't cite any prior influences on his design, so it's not clear if he even knew his "design" was completely derivative of what I'd posted. Then again, he didn't repeat my faux pas of calling a standpipe an "upstand." ::blush::

It's not like I do any of this for money or even fame. I really do just want to make aquaponics accessible to the maximum number of people. But it was surprising to see myself so completely copied, if copied imperfectly. Heavens knows I've learned much of what I know about aquaponics because of the generosity of individuals who made their information available on the internet. But there are a couple of ideas that weren't out there before I posted them.

I'm reminded of a wonderful poem my mother wrote. In later life she went back to college to complete a Bachelor's Degree. In one of her college textbooks, she found her poem, attributed to "Anonymous."

The Gardener
by Pat Chiu

If you were a gardener, your child the seed,
Your task it would be to nurture and weed
'way wild things that threaten distruction and strife
and prepare the young plant for the rigors of life.

But a daisy's a daisy. A rose is a rose.
The child must be true to its form as it grows.
True to the form from the maker sent
And not to the will of the gardener bent.

There are so many people to whom I owe my understanding of aquaponics. And in some cases they may have been leveraging knowledge from others of whom I never knew. We all stand on the shoulders of giants.

May those who've learned from my little contributions go on to further the journey. Upward, towards more effective and efficient systems, and forward, towards ever-more affordable ways of doing this kind of gardening.

Thursday, February 14, 2013

No Heaters and the Fish are Still Alive

A picture of one of my bluegills from last summer


One of the most fundamental tenets of medical ethics is primum non nocere, or "first, do no harm." In the practice of medicine, this means it may be better to do nothing rather than commit an act that risks causing more harm than good. When it comes to aquaponics, I've taken this advice to heart when it comes to feeding my fish and heating their environment.

I covered the greenhouse in early January but I didn't get around to connecting my rocket mass heater and solar heaters. Last year I was worried about either exhaust leaks or melting things in the case of the rocket mass heater or pumping cold air into the greenhouse during overcast days in the case of the solar heater. I eventually figured out how to overcome these difficulties. But 24 hours isn't enough time to do everything I want to accomplish in a day. As a result, my lovely heaters haven't been in use this winter. When I say "No Heaters and the Fish are Still Alive," I mean there has been no supplemental heat at all this entire winter.

And yet the fish (goldfish, bluegill) have survived.

I had a scare while we were fixing dinner for Chinese New Year. My son-in-law mentioned the green onions in the dishes were from the garden. Since I hadn't been to the garden that day, I asked about my goldfish. The goldfish live in the sump tank, and the sump tank water levels had gotten low that week.

He said, "I didn't see any goldfish. But the water is only a quarter inch deep in that tank."

I was sure the fish were dead. But when I got a chance to go out and inspect, I saw that the sump tank, though nearly empty, still had a couple of inches in the bottom. The pump is elevated on a pad so it stops pumping water when the level drops that low. The three goldfish were still in there, alive and well though cold.

In the same vein, I've worried about the bluegill. During cold snaps, I've gone for days and even weeks without visiting the greenhouse, much less feeding the fish. Whenever that happens, I begin to worry that I've got a tank full of cold water filled with dead fish. I'm just hard-wired to think an animal has to eat every day. Intellectually I know it's actually more harmful to feed fish when the water is nearly freezing. But the anxiety monster grows until I get a chance to go out and lift the lid of the tank. So far I've not had a single bluegill die.

I did lose my single surviving minnow, a fathead minnow or toughie (tuffie) as they are sometimes called. However, these minnows are only supposed to have a lifespan of 14 months. It's rather astounding that this solitary fish had managed to survive for at least 22 months after I bought him. If I thought my toughie had died of disease, I would have disposed of him outside the garden. Old age, however, isn't a communicable disease.Since the water was near freezing, I slid him into the bluegill tank, where one of the fish made a quick meal of my toughie's mortal remains.

Though nighttime temperatures will continue to drop below freezing, the weather should warm from here on out, on average. More importantly, the days will become increasingly warm, and the longer days will begin pumping heat energy into the greenhouse, to the point that I may have to start lifting the side walls by April or May.


Average highs, lows, and rainfall

Wednesday, January 23, 2013

If I Were Starting from Scratch...

Southern State's 250 Gallon Poly Stock Tank

Southern States has apparently created their own line of stock tanks, and it almost makes me wish I could start over from scratch. These bright blue tanks are UV protected and less expensive than Rubbermaid tanks of the same volume. Plus, there are a few unique sizes and shapes, like this 250 gallon tank that could be positioned in a corner.

Now that I've lived the life of trying to observe my relatively dark fish in a black, covered stock tank, I also like the bright blue color. It wouldn't be everyone's preference, but I'm always thrilled to see a new, commercially available tank option!

In other news, I found out I have a supplier for expanded shale within a pleasant drive from DC. Matthew Ferrell has started a company called HydroShale, and is selling expanded shale that is the right size for aquaponics (3/4 inch). It's a bit pricey if you need to have it shipped, but if I can pick it up, I can get it in bulk for less than even the expanded clay beads Home Depot sells online (ViaStone from ViaGrow). Nothing will ever be as inexpensive as gravel, but I do like working with these lighter materials.

In the mean time, I'm just glad I finally put up my greenhouse this past weekend. The garden and fish have done amazingly well without cover for the first portion of winter, but the temperatures will remain well below freezing for most of this week. But with the protection from the wind and solar heating during the day, I expect my garden and fish will weather this bitter week adequately well. Hooray for bluegill and goldfish!

Sunday, January 13, 2013

Q&A: Keeping fish waste from clogging the sump pump?

From time to time someone tracks me down and asks a great question. I usually end up spending a minor chunk of time answering. Here's a recent question I thought might be of interest:

Hello Meg,

Thanks for 365 Aquaponics. I find it very informative for my future plans in aquaponics. I had some quick questions- How do you keep fish waste from cloggin up the sump pump?

Thank you very much! Regards, R


Here's what I do:

  • I have relatively narrow pipes taking overflow water from my fish tank to my sump. This is not a good thing - if I were doing this over again, I'd make sure my drain to the sump was at least 2 inches in diameter. It's a solids lifting overflow, so it's supposed to suck the fish tank wastes out, and it does, to a certain extent.

  • I don't have a swirl filter. This is also not a good thing. I really like the swirl filter in the HD Aquaponics youtube videos (episodes 28 and 29 show it, as I recall. I have all the parts to implement a swirl filter constructed out of a 5 gallon water bottle sometime soon.

  • I have goldfish in my sump tank. They love to munch on stuff. So they keep the sump tank pretty clear. I also have a cover over my sump tank.

  • My pump is slightly elevated. I originally put it on a 1 inch thick plastic mesh pad (repurposed the internal pump filter) because I wanted to reduce the noise of the pump. But elevating the pump does three other great things:
  1. The plastic mesh isn't inside my pump. Leaving the plastic mesh filter inside the pump can leave you with a nasty slimy mess that you have to clean frequently. If you still want to have some waste filtration, put an external mesh bag filter over your pump.

  2. The waste that is in the system falls to the bottom of my sump. Since the pump is ever so slightly elevated, chunks of gunk are less likely to get sucked into the pump.

  3. If the water level in my sump tank gets low, the pump stops emptying the tank when there's still an inch or so of water in the tank. My goldfish who live in the sump tank are still able to get around and remain in water, so I'm pretty happy about that "accident."

Good luck!

Meg

____________________________________

Sunday, December 9, 2012

What to do with mint?

Our Mint Eradicator

This past summer I haven't spent much time in my garden. I was out of the country for work several times, a family member passed away, and I had a big project that caused any number of late nights.

In the mean time, my aquaponic garden grew like gangbusters. Unfortunately, I let a friend give me some mint. She's a kind-hearted soul who hates to let any living thing die.

Luckily for me, my daughter acquired a rabbit this fall named Silver. He's a chinchilla colored rex buck (for those of you who know rabbit terms). Luckily for me, Silver loves mint. So I can pull it out in big handfuls and he'll happily munch it down. We have enough mint from this past summer to keep Silver happy for quite a long time yet to come.

My last post was about making emergency lights for Hurricane Sandy. Luckily, our power didn't go out for long and the storm passed us by. I had a chance to spend a long weekend up in New York helping clean up homes in Queens, which was hit particularly hard by the storm.

Hope you have a great holiday season! I'll be back posting about aquaponics again in the new year. Greenhouses, solar heaters, and more!

Monday, October 29, 2012

Making an oil lamp

Two DIY Oil Lamps - Soot is from blowing out the wick instead of dowsing it in oil

Hurricane Sandy is hovering over us at the moment. Since we expect power to go out today (and stay off for several days), I thought I'd share how to make a simple oil lamp from materials most people have at home.

You'll need:
  • pliers (needle nose pliers are best)
  • a thick glass jar or glass (works with goblets as well)
  • oil (olive oil is ideal if you have it)
  • wick (can make from cotton cloth if you don't have wicks)
  1. Twist a coil in the end of your wire. This will hold the wick and prevent the flame from burning down the wick.
  2. Bend the wire so the wick is held in the center of your jar. It helps to bend a small loop in the wire where it will be outside the jar to help you lift the wire out of the jar for lighting your wick.
  3. Push the wick up through the coil. Pull the wick so it is only an 1/8th of an inch over the wire coil. The end of the wick should be long enough to reach the bottom of your jar.
  4. Place the wire and wick in your jar.
  5. Add oil to your jar so it comes just below your wire coil. You can pour the oil over the wick if you want.
  6. Pull the wire/wick up and light it. Oil doesn't like to burn, so it won't catch very quickly.
  7. When the wick has caught, lower the wire/wick down into the jar.
  8. If the flame is too high, life the wire/wick out and tug gently on the bottom of the wick to reduce the amount of wick sticking out above the coil.
  9. When you want to extinguish the flame, dip the flaming end of the wick in the oil. The oil will not catch on fire, but will immediately cool the hot end of the wick. This will prevent the wick from smoking, which it will do if you just blow it out.

If you don't have wicks in your utility drawer, you can cut strips of cloth from either a cotton t-shirt or a used tea towel. These home-made wicks will last longer if you lay them in a shallow dish of water, then sprinkle liberally with salt. Let them soak for an hour, then let them dry. For more information, read Ruth deJauregui's article on How to Make a Wick for an Oil Lamp Using Recycled Materials.

Here are some more pictures.

Materials you can use to make your oil lamp


A closer view of the wire/wick assembly


Lighting a second wick from a lamp that is already burning


PS - As always, be careful with fire. The top of the jar will get hot.