Total Pageviews

Monday, October 29, 2012

Making an oil lamp

Two DIY Oil Lamps - Soot is from blowing out the wick instead of dowsing it in oil

Hurricane Sandy is hovering over us at the moment. Since we expect power to go out today (and stay off for several days), I thought I'd share how to make a simple oil lamp from materials most people have at home.

You'll need:
  • pliers (needle nose pliers are best)
  • a thick glass jar or glass (works with goblets as well)
  • oil (olive oil is ideal if you have it)
  • wick (can make from cotton cloth if you don't have wicks)
  1. Twist a coil in the end of your wire. This will hold the wick and prevent the flame from burning down the wick.
  2. Bend the wire so the wick is held in the center of your jar. It helps to bend a small loop in the wire where it will be outside the jar to help you lift the wire out of the jar for lighting your wick.
  3. Push the wick up through the coil. Pull the wick so it is only an 1/8th of an inch over the wire coil. The end of the wick should be long enough to reach the bottom of your jar.
  4. Place the wire and wick in your jar.
  5. Add oil to your jar so it comes just below your wire coil. You can pour the oil over the wick if you want.
  6. Pull the wire/wick up and light it. Oil doesn't like to burn, so it won't catch very quickly.
  7. When the wick has caught, lower the wire/wick down into the jar.
  8. If the flame is too high, life the wire/wick out and tug gently on the bottom of the wick to reduce the amount of wick sticking out above the coil.
  9. When you want to extinguish the flame, dip the flaming end of the wick in the oil. The oil will not catch on fire, but will immediately cool the hot end of the wick. This will prevent the wick from smoking, which it will do if you just blow it out.

If you don't have wicks in your utility drawer, you can cut strips of cloth from either a cotton t-shirt or a used tea towel. These home-made wicks will last longer if you lay them in a shallow dish of water, then sprinkle liberally with salt. Let them soak for an hour, then let them dry. For more information, read Ruth deJauregui's article on How to Make a Wick for an Oil Lamp Using Recycled Materials.

Here are some more pictures.

Materials you can use to make your oil lamp


A closer view of the wire/wick assembly


Lighting a second wick from a lamp that is already burning


PS - As always, be careful with fire. The top of the jar will get hot.

Monday, September 3, 2012

Videos of Rocket Mass Heater and Bell Siphon

Here are a couple of videos I finally got around to putting together this weekend. The first shows a small bell siphon system I put together for a science fair last February. I used a bin I got at Ikea a few years ago, that happened to fit perfectly on top of a 10 gallon fish tank.

Over time a glass bell will start to grow an algae film, which rather defeats the purpose of having a clear bell. But it's fun for a science fair or classroom.


Small system I put together for a Feb 2012 science fair


That month I also put together my final rocket mass heater configuration, using cinder block and bricks with the 55-gallon steel drum.


My Rocket Mass Heater in Feb 2012


I like using the cinder blocks in the place of the insulated section of chimney because it is far less expensive. In addition, four stacked blocks are the perfect height inside a standard 55 gallon steel drum, leaving 1.5-2 inches of space for the gases to escape at the top.

Within minutes of me posting the cinder block rocket mass heater video, someone warned me that cinder blocks explode in fire. I have had no problem with this in the fires I've burnt in this system over the past six months. But I checked it out.

Allegedly moist cinder blocks can be a problem in fires - the water rapidly evaporates and the expanding gas can cause the blocks to shatter. My blocks aren't getting wet since they are covered by the steel drum. If they were to shatter, the flying bits would be contained inside the steel drum.

While I've read too many accounts to completely discount the danger of exploding cinder blocks, a search for exploding cinder blocks only yields videos of young men blowing up gunpowder inside a pile of cinderblocks (a really, really bad idea, by the way).

This fall I'm planning to reconfigure my greenhouse so the rocket mass heater is inside the enclosure itself. That way I'll capture the radiant heat off the heater itself, not just the heat traveling through the exhaust ducting running under my grow bed. I'll also be playing with solar heating. Fun times!

Sunday, July 22, 2012

Geo-thermal Cooling

It's been extremely hot outside this week, and we're suffering a significant drought in much of the country. The chart above shows the levels of streams compared to their historical levels for this time of month. Though some regions are getting a lot of rain (the deep blue dots), much of the center of the country is experiencing drought conditions reminiscent of those over sixty years ago. The Dustbowl, as the period from 1934-1936 became known, was a drought characterized by Roland Dewing as the "most extreme natural event in 350 years."

Back to the heat, I got thinking about the Underground Heating Exchange Systems (UHES) the Chinese developed a while ago. The idea to pump air underground was first patented in the United States in the wake of the oil crisis in the 1970s. But the Chinese picked up on this technology and highlighted it as part of an integrated agricultural approach to feeding the Cold North East.

When I saw the Chinese paper (republished on the UN FOA website), I thought it was amusing that they'd used clay pipes for their experiment. After all, folks in the US typically use plastic drainage tubing for this sort of heat exchange system.

Then I got thinking last night - a problem with the plastic is getting it to simultaneously drain the water that condenses and keep out roots and pests. Clay pipe didn't sound bad, after all. Then the light bulb went off.

What if I used cinder blocks underground for the heat exchange "tubing?" At $1.65 per linear foot, it is more expensive than the HDPE drainage pipe. But I wouldn't have to worry about water draining through the blocks (it would) and I wouldn't be worried about the "tube" getting crushed.

That took me on another little adventure of the mind, as I tried to figure out how deep to run the "pipes" underground. The Chinese used half a meter, but what if one went deeper?

The ground temperature at 30 feet below the surface is constant - which is why caves are cooler than outside in the summer and warmer than outside in the winter. How far below the surface do I need to go to get to that constant heat, I wondered?

Then I found out something really fun at the Build it Solar website. It turns out the temperature profile of the ground lags the air temperature profile. Air temperatures peak in July (in my area), but the soil temperature peaks in August.

Then comes the cool part. That peak heat migrates slowly down towards the earth's heat skin, so that the date of peak heat level at deep depths lags the temperature of the surface soil by weeks and months.

So not only will deep Underground Heat Exchange Systems access a larger thermal mass, the ground around that thermal mass will actually be heating up when the rest of the world is cooling down.

I'm not sure how practical it is for a home owner to dig down 6 feet or more, but this kind of effort would be within the reach of a minor business. I would love to experiment with this next summer, if I can find a lot where I could dig deep...

Saturday, July 7, 2012

My new "Green" car

You're probably looking at this picture and wondering how an old 1999 Ford Escort is a "green" car. Let me explain. I've been in the market for a new-to-me car and spent a fair amount of time doing market research on the new cars on the market these days.

I particularly love the Fiat 500 because it's cute and reminds me of the two years I spent in Italy in the 1980s. The minimum advertised price for one of these is $15,500 and it gets 30/37 MPG with premium fuel. I even kow all the old Italian songs about the 500 or "cinque cento."

The engineer in me loves the Toyota Prius, starting at about $24,000 and getting 51/48 MPG. Some family members have Priuses, so I've had a chance to drive them and check out the features (video showing reversing, keyless entry, trip computer plus GPS). Prius is definitely a nice car.

I've really liked the smart car since the Smart Fortwo came out in the US in 2008 (starting at $12,500 and getting 34/38 MPG). Alas, my husband requires we have cars that can fit the family, so he wants a car with four seats.

Harrumph.

In a few months the first all-electric version of the Smart Fortwo will be available for individual consumers. The cars have a range of almost 85 miles, based on data from the Car2Go carsharing service, which has been using the Smart Fortwo vehicles in their fleets since November 2011. In fact I got myself an account with the Car2Go service in the city where I work. Unfortunately, I live outside the city limits, so the carsharing idea doesn't meet my commuting requirements.

So why buy an old car, when all these new cars are so awesome and "green?" Though a new car saves any amount of gas money and emissions for the owner, there's always the fuel, water, and emissions incurred in creating the car in the first place. In 2010 Mike Berners-Lee and Duncan Clark at The Guardian said it takes about 17,000 metric tons of CO2 to produce a new car. By comparison, the US EPA estimates the average passenger vehicle produces 5,000 metric tons of CO2 per year.

So if I buy an older car and drive it for 3 1/2 years, it's the same CO2 impact as purchasing a new car and leaving it in the garage for 3 1/2 years. It'd take a powerfully fuel-efficient vehicle to get me a ROI in less than, say, 10 years.

The 1999 Ford Escort I just bought has less than 65,000 miles on her. She could stand getting aligned and no doubt needs a tune up. But she cost me about $3000 and this year/make/model routinely gets ~30 MPG based on actual customer results (based on 50+ fill-ups). It would take a really, really long time before I could earn a return on investment for any of these new green cars in terms of either money or CO2 emissions relative to this old but new-to-me vehicle.

There are other perks. My insurance rates will be lower, as well as my local car taxes. Repairs will be less expensive when required, and this car has the old-fashioned keys that can be copied at the store for less than $2.00.

And you know the really funny thing? The car, itself, is actually painted green. You can't get more "green" than that!

Friday, July 6, 2012

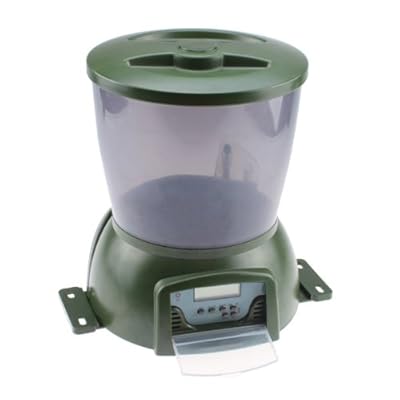
Automatic Fish Feeders

I go on travel a lot. I have people who can feed my fish when I'm away, but sometimes they forget. Sometimes I forget, when it's busy.

I've had my eye out for some good way to feed my fish their pellets. Most automatic fish feeders I'd been seeing were either too large or too small. We never even got to the "too expensive" category.

Then I found a "Programmable Automatic Pond Fish Food Feeder With LCD display" on Amazon for less than $50. It looks like it should work, and it's free standing.

Purchased the commercial unit online and have been looking forward to playing with it. Then my buddy, Rob Torcellini, posted a youtube video about the automatic fish feeder he has created. So cool! I don't have a tack welder or a sand blaster, but the video gives me an idea how I could create an automatic fish feeder using the tools available to me.

Luckily for my fish, there's a commercial feeder en route. But for fun, I look forward to seeing if I can rig up a DIY something to work in case the feeder I've bought were to fail. Should be fun!

Thursday, July 5, 2012

Community Supported Agriculture

This past spring a lady at church e-mailed about the CSA farm she wanted to join. The hook - if we all ganged together, we could get cheaper delivery than if we went separate, and we also wouldn't have to drive out to the farm every week.

I figured a half share wouldn't be too dangerous - after all, how many fruits and vegetables could that actually be?

A lot, it turns out.

Between the crops I'm harvesting from my aquaponics system and the boxes of fruits and veggies from the CSA, we are well and truly over-run with yummy vegetables. Luckily, the CSA publishes recipes and lets us know what these things are. I had never eaten Patty Pan squash before, for example. Who knew a meal of Patty Pan Squash Fritters could be so amazingly filling.

Tonight we had sauteed beet greens with pistou from last year's garden, along with the squash fritters and pickeled onion and red beet eggs. So good! So filling!!

Wednesday, July 4, 2012

How it all started in Australia


I'm writing about Australian Fish, and wanted to hark back to the 2006 segment on Gardening Australia that kick-started aquaponics in Australia. It was a five minute tour of Joel Malcolm's backyard paradise, lush plants powered by silver perch and yabbies, all free of chemicals and enjoyed to the sound of constantly flowing water, yet far more water-efficient than any other form of gardening.

I searched my blogs high and low and couldn't find this video. Crazy! So here it is. If you've seen it, you know how delightful and relaxing Joel's 2006 garden paradise appeared to a parched nation worried about chemical additives.

Enjoy!